During the data import process, Kinaki will take you through 4 steps:
- Selecting the file to import
- Reviewing incompatible questions
- Reviewing new questions
- Reviewing new answers
Note: If there are no changes to your form or survey from one data collection to the next, the data import process will be simple and you will not have to go through most of these steps. However, if changes are made to the data collection tool after the first data import (i.e new questions or answers added) you will need to address these changes as you import the data. This article goes through a number of scenarios in which new questions and answers are added to help you address these changes with your own data import.
Let’s go through each of the above listed steps!
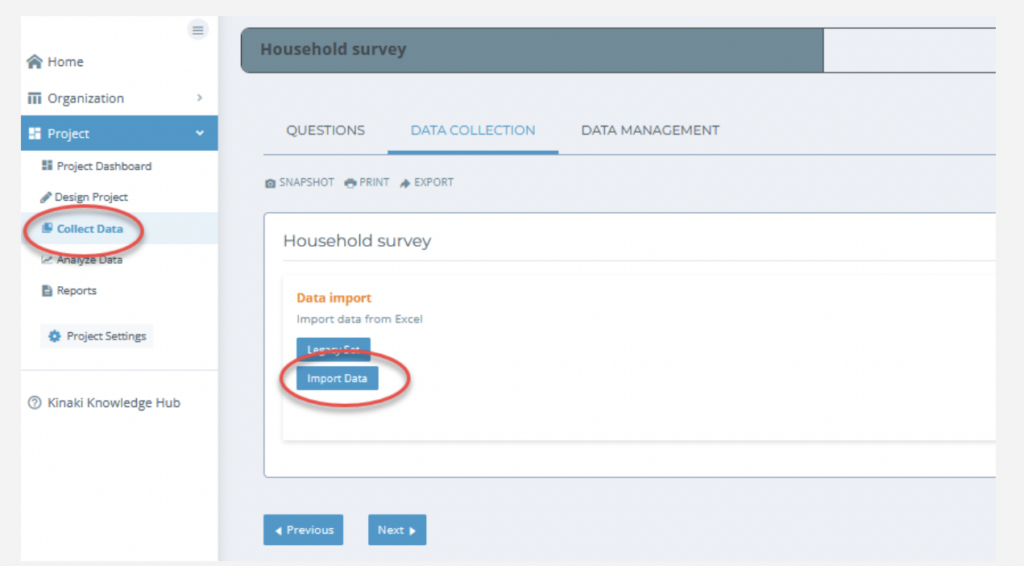
Selecting the Data File
To begin the data import process, go to the “Collect Data” page and ensure you have the correct Data Collection Tool in the selector in the top menu.
Next, go to the “Data Collection” tab, select “Import Data” and then “Next”
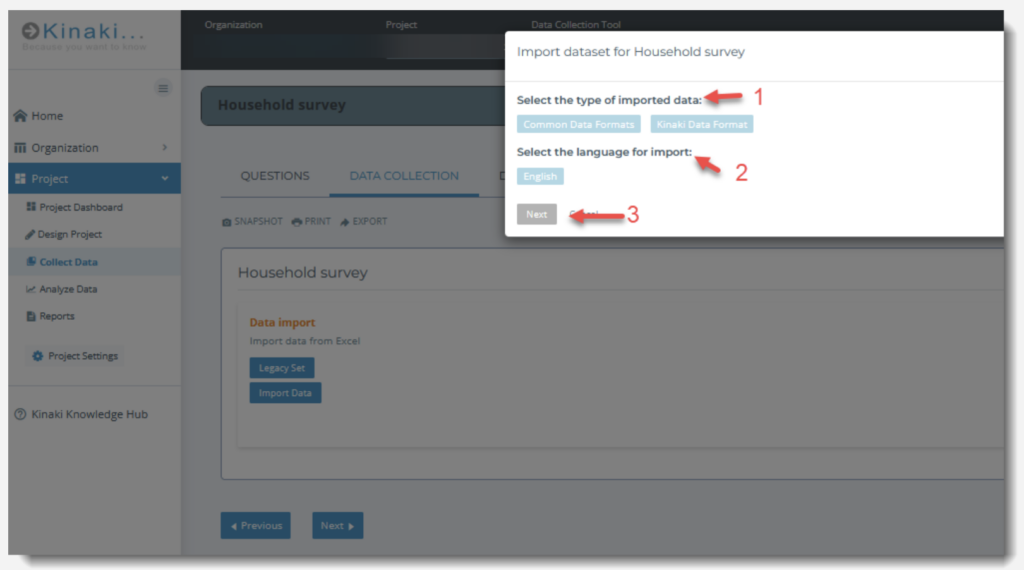
In the data import window, select the appropriate data format (1). Select “Common Data Formats” for data from Kobo/ODK/SurveyCTO or “Kinaki Data Format”.
Next, select the language of your file (2) from the list of project languages. (This is relevant if you exported Labels rather than XML Values from Kobo. If you have a file with the XML values, select any of the languages.)
Click “Next” (3) to select your file to import or use the drag-and-drop upload.
When the data has been imported Kinaki will summarize for you the number of:
- records you’re importing
- existing questions in the data collection tool
- new answers
- incompatible questions
If there are incompatible questions, Kinaki will ask you to review them. Let’s explore how to do this!
Reviewing Incompatible questions
Now that you have selected the file to import, you will review if there are any incompatible or new questions.The purpose of this step is to determine if the questions in your data file match the questions that you previously imported to Kinaki.
If this is your first time importing data or questions to Kinaki, Kinaki will identify all the questions as “new”.
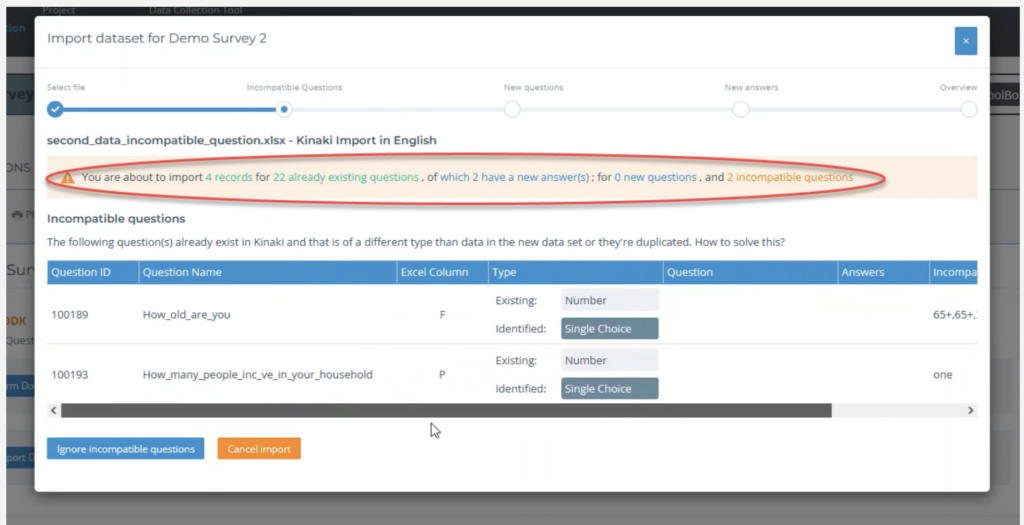
If Kinaki identifies incompatible questions this is most often due to Question Type changes or values that are there in error in your data. For example, if a question that was previously single choice is now multiple choice, or if instead of the number “1” the values are now written out as “one”
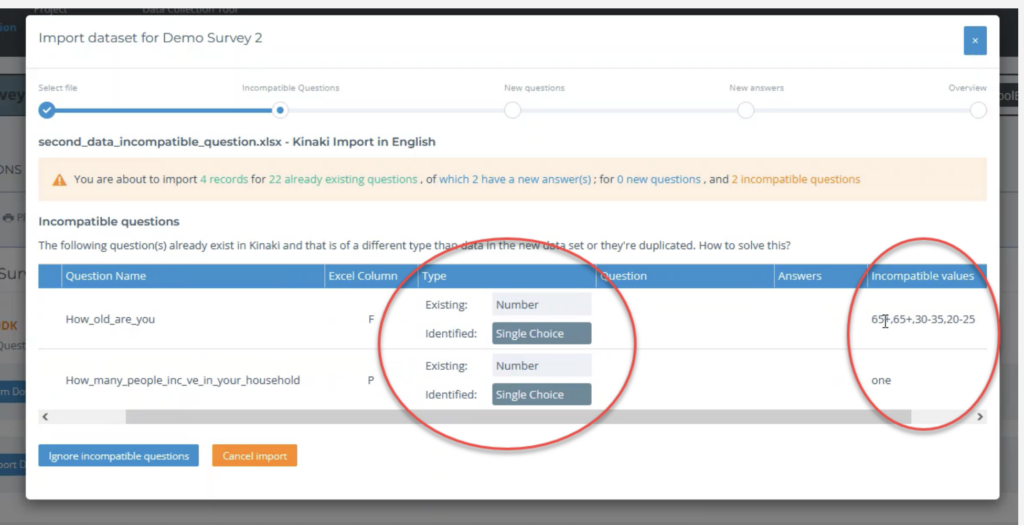
In the example below you can see that two incompatible questions were identified. For both Questions the existing Question Type for that question in the Data Collection Tool was “Number” but in this import it is identified as “Single Choice”. When you look under “Incompatible Values” you can see what values were identified that were different from those uploaded to Kinaki previously.
To resolve this issue, you will have to cancel the import (select the orange “Cancel Import” button) and go to the “Questions” (1) page under “Collect Data” for your Data Collection Tool and find the incompatible question (2).
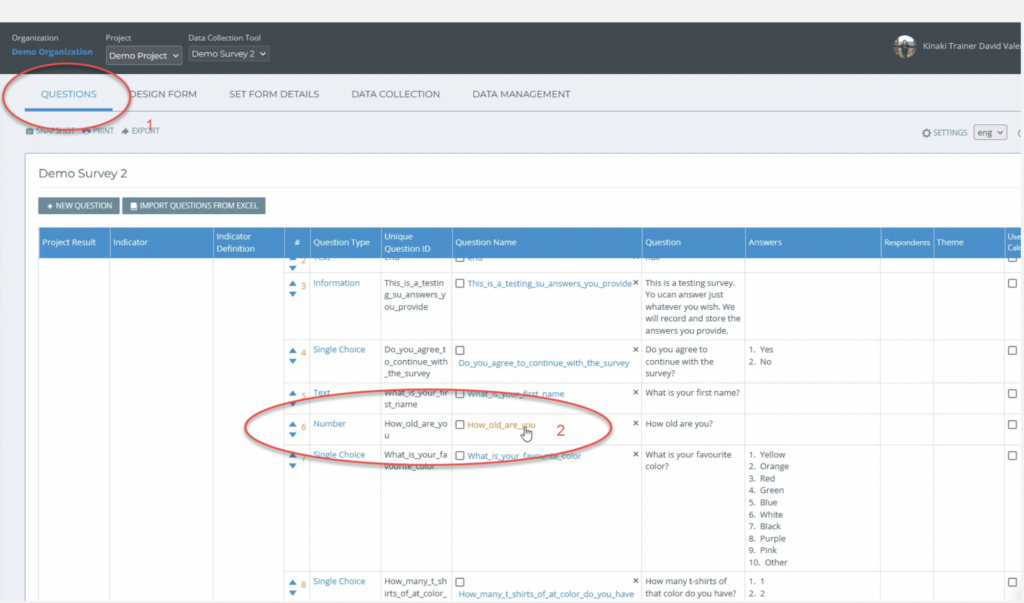
Since this question (“How old are you?”) had an incompatible question type, we will change the question name of the existing question, so when we import the data again the question will not be identified as incompatible but “new”. We cannot change the question type, because any previously imported data for this question would not be usable. This means we will need to use both questions on the Analyze Data page if we are analyzing any indicator involving age.
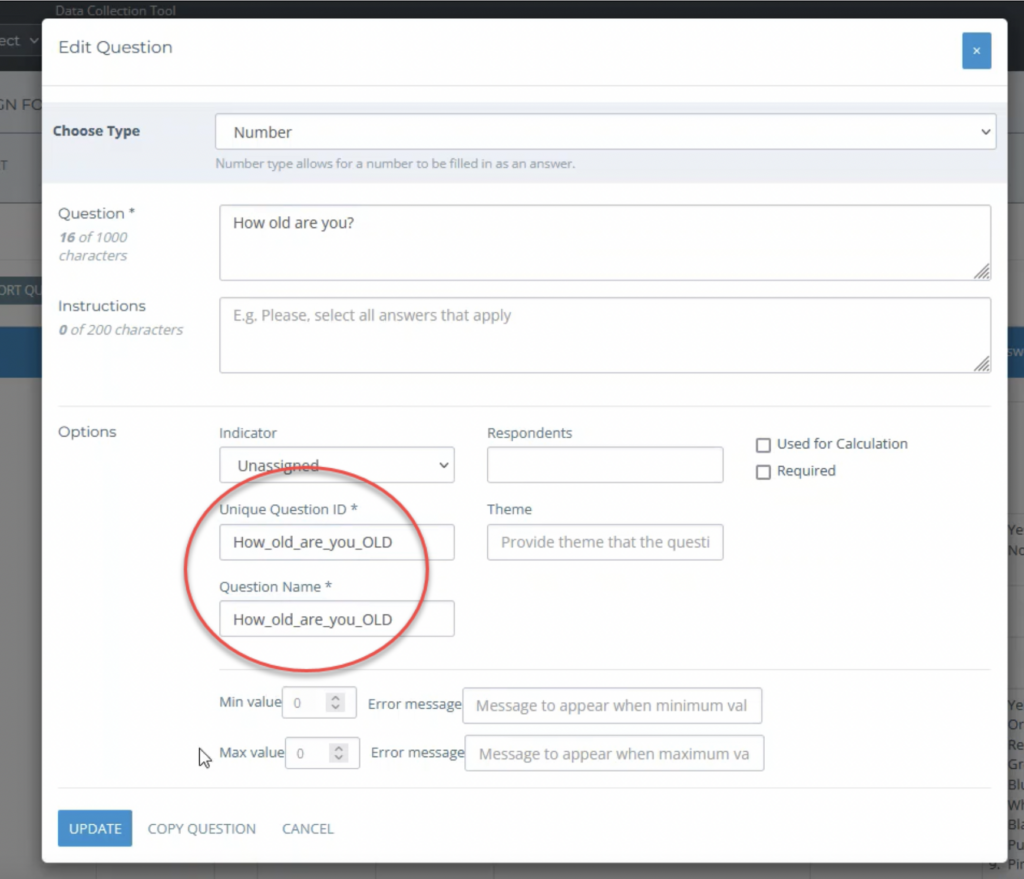
Select the question name to open the “Edit Question” window. Under “Unique Question ID” and “Question Name” we added “OLD” so we will know that this is the original question and is different from the new question we are about to import.
For the second incompatible question, Kinaki showed us that there was only one value that was incompatible. To fix this, you can open up the original XLS file and change the value to “1” instead of “one” and then save the file.
Once you have fixed all your incompatible questions, return to the “Data Collection” page and import the file.
Next, Kinaki will ask you to review any new questions (if there were no incompatible questions, Kinaki will proceed to this step right away). Let’s go to step two: New Questions.
Reviewing New Questions
If this is your first time importing data or questions for this Data Collection Tool: Kinaki will identify all of the questions as “new”.
If you have previously imported questions or data for this Data Collection Tool: Questions will be identified as “new” if you added new questions to your survey or form that were not included in previous data collections. Or if the question name was changed from the previous data collection. If that’s the case, Kinaki will identify that there is a (are) new question(s). This step gives you an opportunity to decide if you want to import the data for the new question(s) to Kinaki.
For detailed steps watch video number 6 on the Kobo Tutorial of the Knowledge Hub.
In this window, Kinaki will show you any new questions added to your data collection tool.
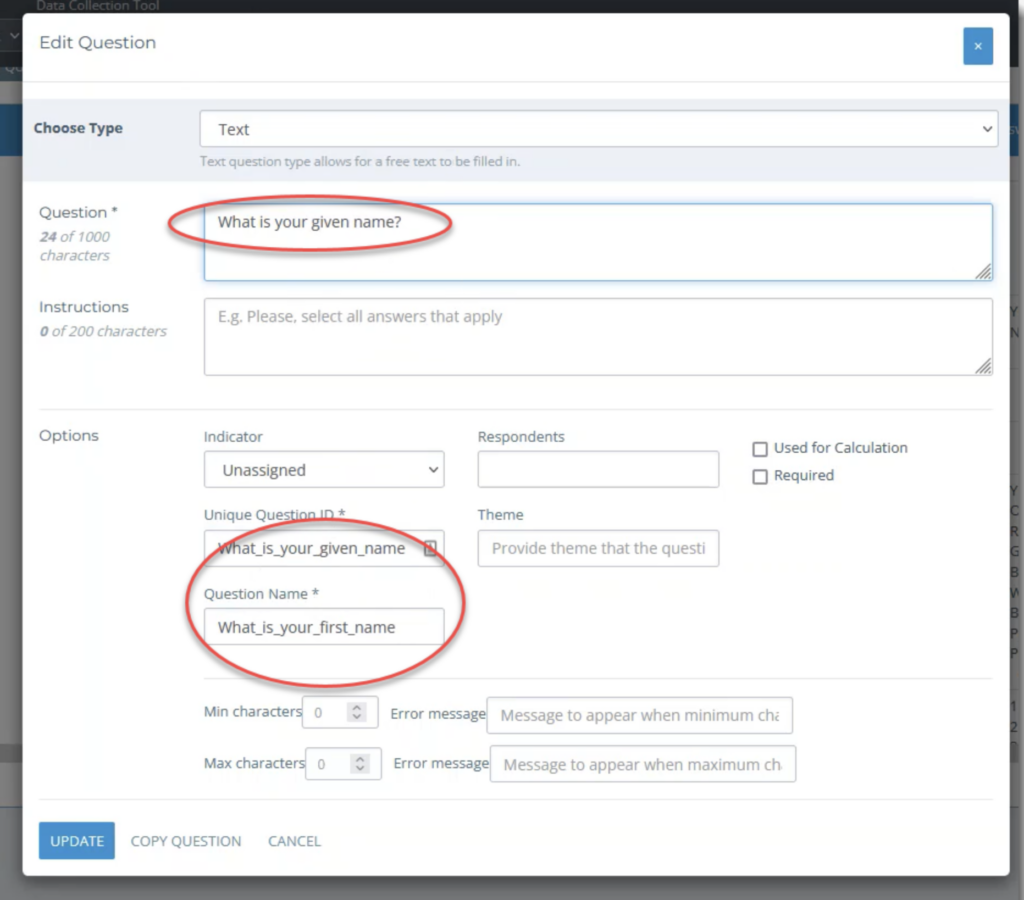
There is also a section in the window titled “Existing questions for which the new data set doesn’t include any data”. This section helps you to identify if a question name has been changed. In this example the question that doesn’t have data was called “What is your first name”, and under the “new question” section we can see that there is a new question called “What is your given name”, since these are essentially the same questions, we can see that someone decided to change the wording of the question. To fix this in Kinaki and merge the data from this question with the previous question, we will need to change the question name.
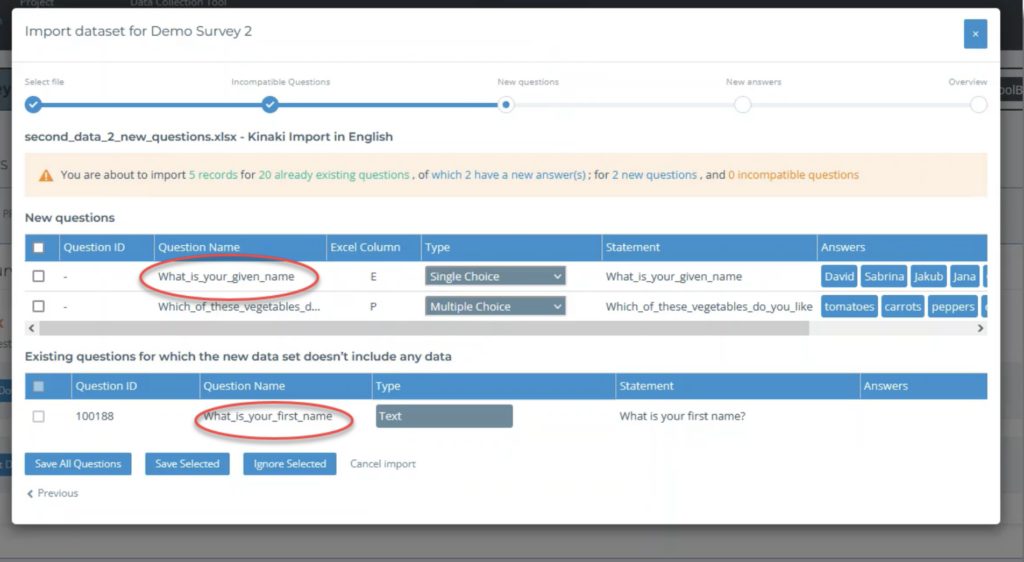
As we did for incompatible questions, we will need to “Cancel Import” and return to the “Questions” page. On the ” Questions” page, find the question with the original wording (“What is your first name”), select the question name to open the “Edit Question” window and change the wording of the question name and Unique Question ID to match the new wording (“What is your given name”). Select “Update” to save the change.
Now you can return to “Data Collection” and import your data again and that question will not be identified as new. It’s a good practice to refresh your page before doing the import again so Kinaki does not remember the old dataset.
Select “Save All Questions” to proceed.
Next, we’ll look at reviewing New Answers.
Reviewing New Answers
For imported answers, only responses that are included in the dataset (and not all potential answers) will be imported.
For example, if you asked respondents what their favorite fruit is and gave the options Orange, Banana, and Pineapple, but no respondent chose Pineapple, Pineapple will not be included in the dataset.
Editing question details on the Questions page, or importing another dataset with those responses, will allow you to add any missing (unreported) entries.
For detailed steps on reviewing new answers, watch Video 7 on the Kobo tutorial page in the Knowledge Hub.
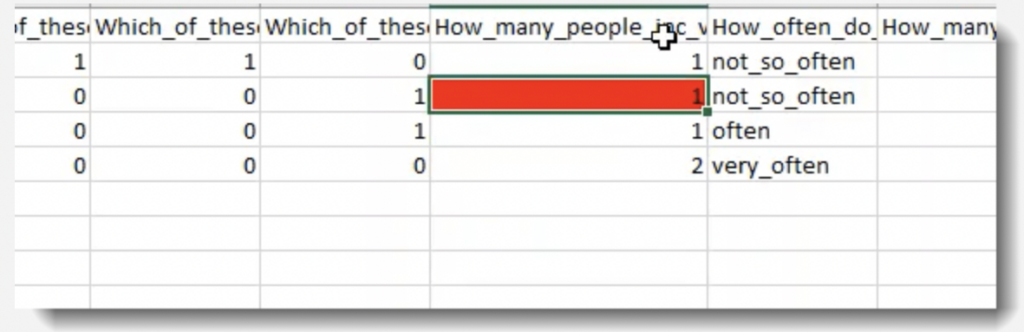
Let’s look at an example. On the “New Answers” page in the data import window, two questions have new answers identified:
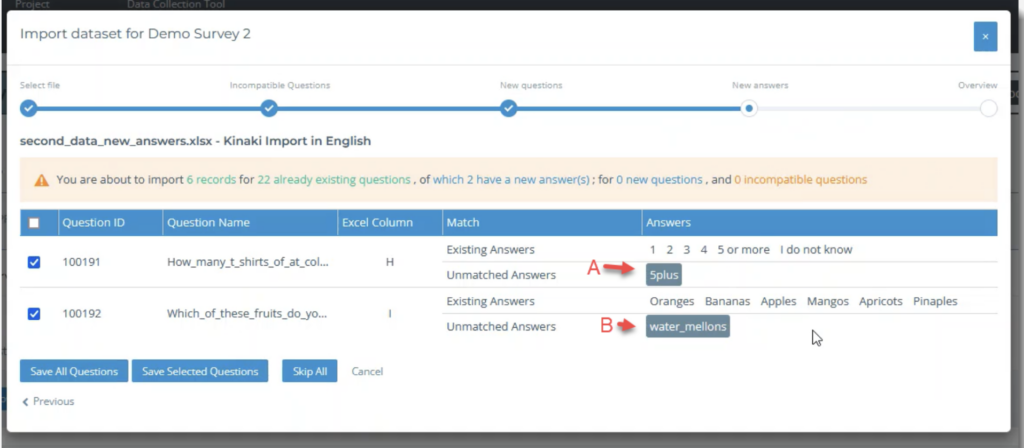
A: For this question, it appears as though the answer ID was changed from “5 or more” to “5plus”. We can verify this by opening the form in Kobo and seeing that “5plus” now replaces “5 or more”. Since the answers have the same meaning, we can edit the answer in the question in Kinaki to match what is now in the data set from Kobo. If the answers do not have the same meaning you will not want to edit the answer in the question and instead keep the new unmatched answer and upload the question as is.
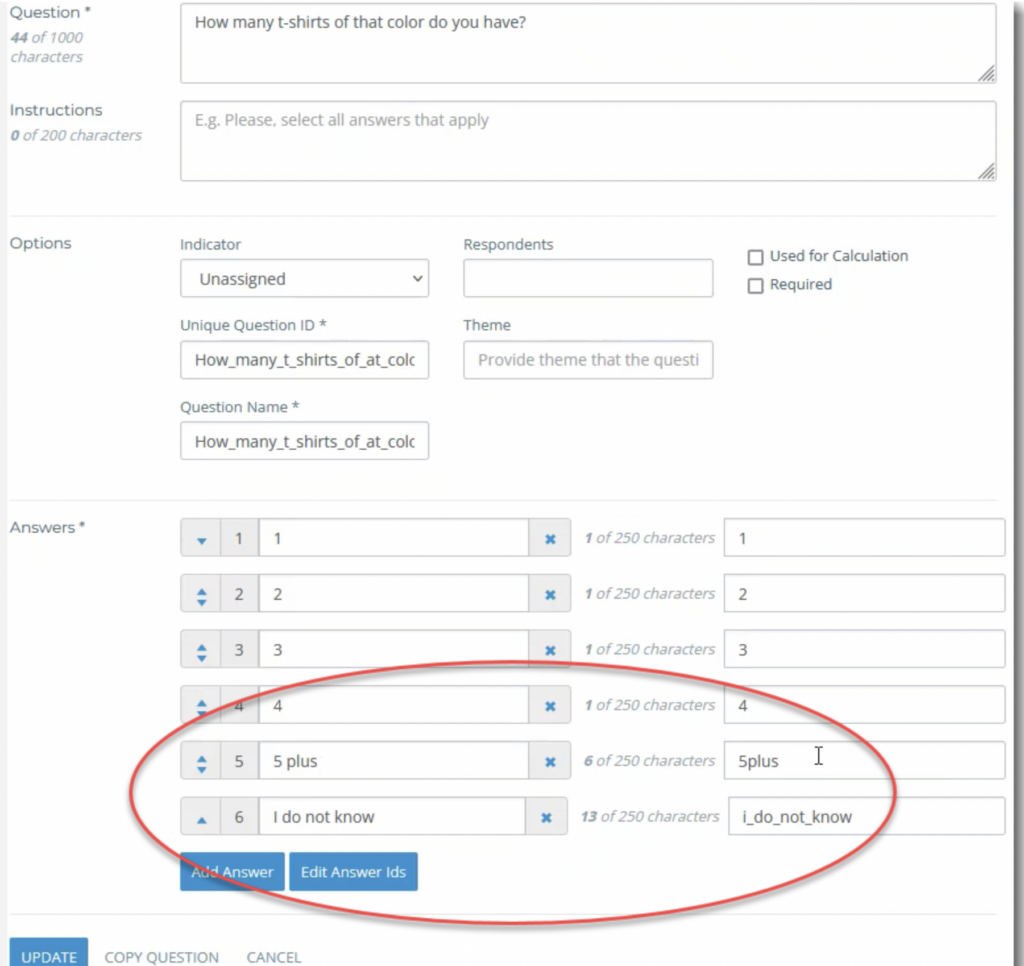
To edit the Answer ID we will go to the “Questions” page, select the question to open the “Edit Question” window and select “Edit Answer IDs” and change “5 or more” to “5plus”:
B: For the second newly identified answer, we can verify in Kinaki that “water_mellons” does not appear to be a duplicate of previously added answer, so it is indeed a new answer and we can import this question with the new answer.
Since you had to cancel the data import to make the change to the answer “5plus”, you will now import the data set again and see that only the one question with the new answer “water_mellons” is visible on this page and you can select “Save all questions” and proceed to the next step.
Next we will look at the Overview page.
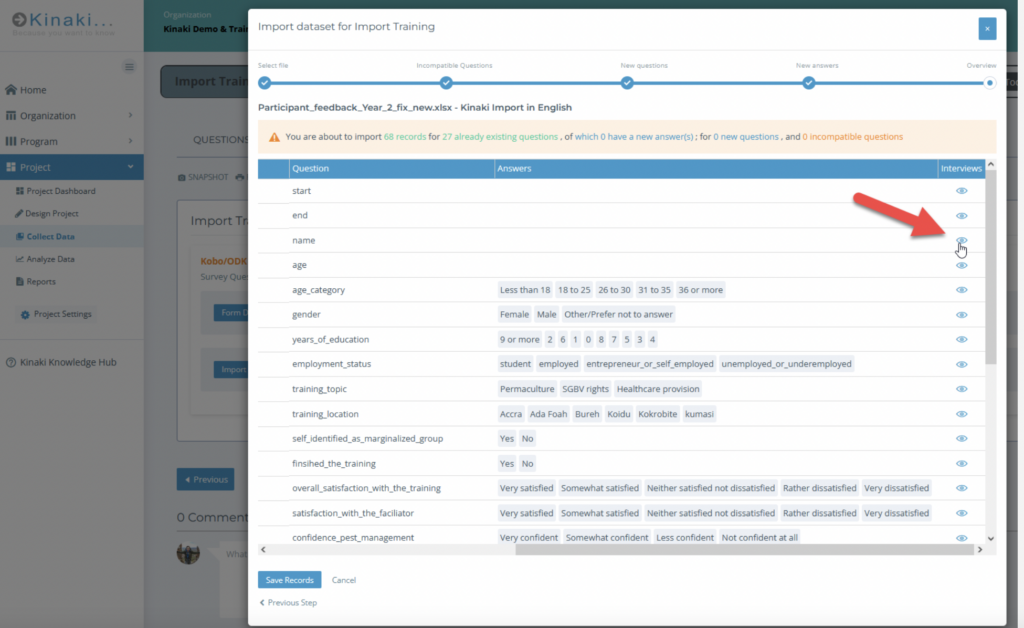
Save Records
The final page will show an Overview of your import. Selecting the eye icon will allow you to review an individual response (as represented by a row in the Excel sheet). Select Save Records to finalize the process.
Next, you can submit the data for analysis on the Data Management page.